


Table of Contents:
This is an essential question in sewing, for both beginners and more experienced sewists. Bias tape allows for clean and durable finishes on necklines, armholes, fabric edges, or decorative projects, but applying it can quickly become frustrating: puckering bias, uneven stitching, or poorly formed corners.
If you’re looking for how to sew bias tape with a sewing machine easily, without complex tools or techniques reserved for professionals, you’re in the right place. In this article, we’ll see how to apply bias tape with a machine step by step, with a clear and accessible bias sewing technique. Whether you want to sew bias tape easily, even without a special foot, or understand the most common mistakes, you’ll find practical solutions here.
The goal is simple: to teach you how to sew bias tape with a sewing machine neatly, achieve even finishes, and build confidence on all your projects. Necessary materials, step-by-step method, tips for corners, and practical advice: everything you need to successfully apply bias tape, even if you’re new to sewing.
What is bias tape in sewing and what is it used for?
Before learning how to sew bias tape with a sewing machine, it’s essential to understand what bias tape really is and why it’s so widely used in sewing. This fabric strip plays a key role in the finishing and durability of projects.
Definition of bias tape in sewing
Bias tape is a strip of fabric cut at a 45° angle to the grainline. This specific cut gives it great flexibility, ideal for following curves without creating wrinkles. It can be found ready-to-use in stores or homemade.
This controlled elasticity explains why applying bias tape with a machine is an essential technique for necklines, armholes, and curved edges.
Why use bias tape instead of a hem?
Bias tape is not just an aesthetic choice. It offers many functional advantages that explain its popularity in sewing.
- Clean and durable finish
- Suitable for curved shapes
- Protection of the fabric edge
- Decorative option (contrast, prints)
Unlike a classic hem, bias tape provides a professional finish, especially on fine or tricky fabrics.
What equipment do you need to sew bias tape with a sewing machine?
Being well equipped makes sewing easier and helps avoid mistakes from the start. Fortunately, sewing bias tape easily doesn’t require much specialized equipment.
Essential equipment for applying bias tape
Here is the basic equipment needed to successfully apply bias tape with a sewing machine:
- Bias tape (store-bought or homemade)
- A standard sewing machine
- Thread matching the bias tape or fabric
- Fine pins or sewing clips
- An iron
This equipment is more than enough to understand how to sew bias tape with a sewing machine for most projects.
Do you need a special foot to sew bias tape?
There are specific presser feet for bias tape, but they are not essential. A standard foot already allows you to get very good results, especially for beginners.
The bias foot can be useful to save time on long strips, but it requires more precision and practice. To start, sewing bias tape without a special foot is often more reassuring.

How to sew bias tape with a sewing machine step by step?
This is the heart of the matter. This simple and progressive method allows you to understand how to sew bias tape with a sewing machine without stress, even on a first project.
Step 1: prepare and position the bias tape
Before any sewing, the bias tape must be properly prepared. It is recommended to press it lightly to mark the folds well.
Place the bias tape right sides together on the fabric edge, aligning the bias tape fold with the edge. Pin carefully to prevent slipping.

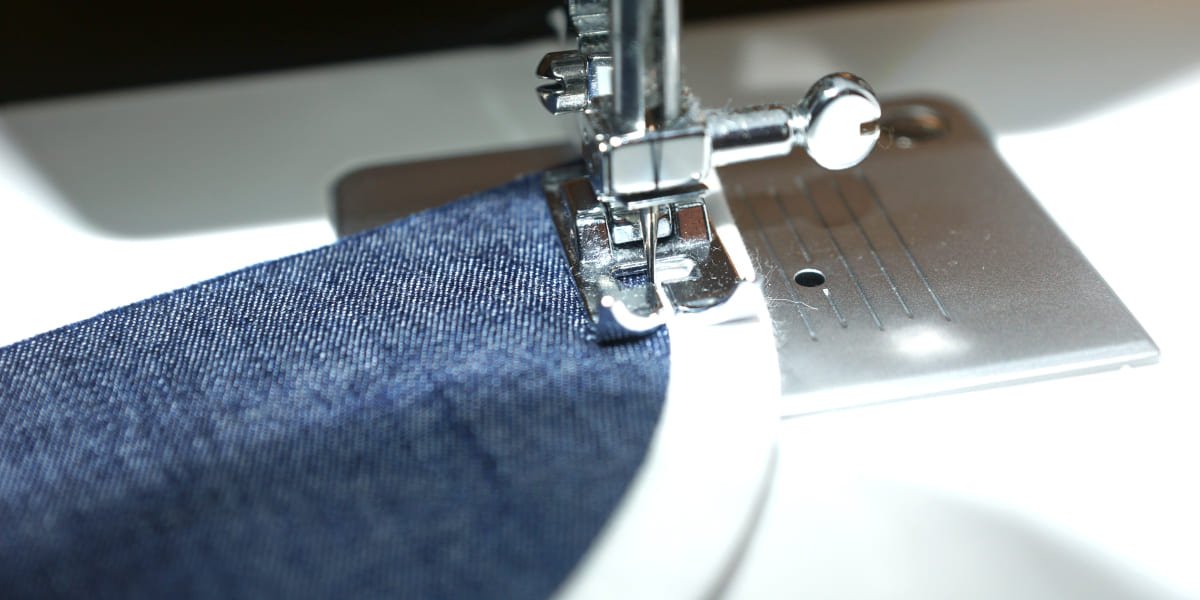
Step 2: machine stitch the bias tape
Sew slowly into the fold of the bias tape without pulling the fabric. Even stitching is essential to avoid waves.
Take your time: accuracy is more important than speed when learning how to sew bias tape with a sewing machine.
Step 3: fold and topstitch neatly
Fold the bias tape to the wrong side of the fabric, then press carefully. Topstitch on the right side to secure the bias tape permanently.

Here is a summary table of the key steps:
| Step | Main action | Practical tip |
|---|---|---|
| Preparation | Press the bias tape | Well-defined folds |
| Stitch 1 | Stitch into the fold | Slow speed |
| Stitch 2 | Topstitch | Even stitching |
How to sew bias tape on corners and curves?
Corners and curves are often feared. Yet, with a few tips, sewing bias tape by machine becomes much easier.
Sewing bias tape at a right angle without puckering
At a corner, anticipate the fold to avoid bulk. Stop sewing a few millimeters from the edge, fold the bias tape up, then down to form a sharp corner.
This technique ensures a clean and symmetrical corner.
Successfully applying bias tape on a curve
On a curve, the bias tape should be eased without stretching. Work slowly and adjust the bias tape as you go.
- Do not pull on the bias tape
- Reduce sewing speed
- Use more pins
- Press between steps
Common mistakes when sewing bias tape by machine
Even when following a method, some mistakes are common. Identifying them helps you improve quickly.
Why is my bias tape wavy?
A wavy bias tape is often the result of fabric stretched during sewing or improperly adjusted thread tension. Slowing down and pressing between each step often solves the problem.
Why is my stitching uneven?
Irregular stitching can result from a lack of stability or rough guiding. Using visual markers on the machine helps a lot.
Bonus for How to sew bias tape with a sewing machine
This section offers advanced advice to further improve your finishes.
Sewists’ tips for a perfect finish
Experienced sewists follow a few simple rules:
- Always iron before and after sewing
- Test on a fabric scrap
- Adjust the width of the bias tape to the project
These tips make all the difference in the final result.
When to favor homemade bias tape?
Homemade bias tape is ideal when the fabric is thick, stretchy, or when you want perfect harmony. It also allows better control of flexibility.
Conclusion: successfully applying bias tape with a machine
Knowing how to sew bias tape with a sewing machine is an essential sewing skill. By mastering the tools, key steps, and tips for angles and curves, you achieve clean and durable finishes. With a bit of practice, sewing bias tape becomes a natural gesture that immediately enhances your projects, no matter your level.
FAQ on How to sew bias tape with a sewing machine
Can you sew bias tape without a special presser foot?
Yes, a standard presser foot is more than enough, especially for beginners.
Which stitch should you use to sew bias tape with a machine?
A classic straight stitch with a medium length is ideal.
How to prevent the bias tape from slipping during sewing?
By using fine pins or clips and sewing slowly.
Should you always iron the bias tape before sewing it?
Yes, ironing greatly facilitates the application and improves accuracy.

Leave a comment
This site is protected by hCaptcha and the hCaptcha Privacy Policy and Terms of Service apply.