


table of contents:
Darts are an essential technique in sewing, which allow you to envelop a volume and adjust a garment to the curves of the body . Whether for a curved chest, a defined waist, hips or shoulders , they provide a harmonious shape and an impeccable drape .
In this article, we will discover how to make a single and double clamp , step by step, for a professional look.
What is a dart in sewing?
Darts are pleats sewn in the shape of a triangle , the base of which corresponds to the amount of fabric removed to create volume, while the tip gradually tapers to blend into the fabric.
The simple clamp step by step:
Mark the landmarks

The first step is to transfer the pattern markings onto the fabric using a fabric pencil or chalk. You must mark:
- Points A and A' located at the base of the clamp.
- Point B represents the point where the seam gradually ends.
Tip: Use special sewing carbon paper to accurately transfer the markings onto the fabric.
Trace the clamp for perfect alignment
To avoid any shifting when sewing, it is essential to mark the dart correctly:
- For thin and slippery fabrics, draw the dependent lines A and A' to B directly onto a fabric laid flat.
- For other fabrics, fold the fabric right sides together , matching points A, A' and B.
Tip: Check that the clip forms a well-balanced triangle before pinning!
Mark the fold and ensure correct alignment


Before sewing, lightly mark the fold with the iron. This step will keep the dart in place and make assembly easier.
- Use tailor's chalk or an erasable pencil to reinforce the line.
- Check that the fold goes perfectly through point B.
Why is this step important? A well-defined fold prevents errors and ensures a precise result !
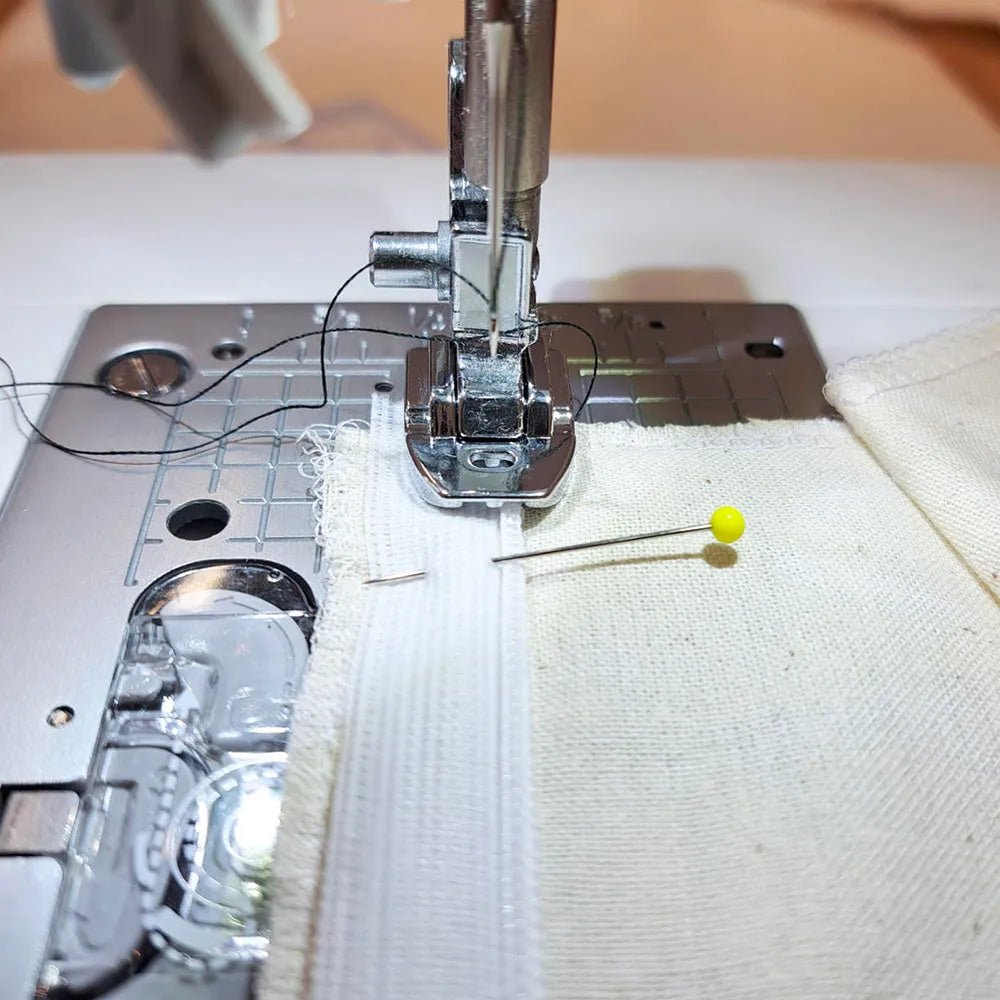
Pin the clip correctly

Once the clip is well marked, it must be pinned correctly to ensure good support during sewing.
- Position the pins perpendicular to the outline.
- Check that the drawn lines overlap perfectly .
- The pin must pierce exactly on the line on each side to avoid any offset.
Tip: Pin carefully without pulling on the fabric to avoid any distortion!
Sew the dart precisely

Now let's move on to sewing the dart!
- Start with a backstitch at base AA'.
- Stitch in a straight line towards B with a straight stitch of length 2.5 .
- Follow the route precisely to avoid any shifts.
Finish the seam neatly

As you approach point B (about 2 cm before the end ), reduce the stitch length for a softer finish:
- Change from 2.5 to 1.5 at the end of the seam.
- Don't backstitch! Instead, leave the threads long, knot them by hand, and hide them in the seam.
Why not make a breakpoint?
This avoids excess fabric which would give a beak effect at the end of the clip.
How to get perfectly smooth darts when sewing?
Sew the last stitches for a discreet finish
The finishing touch to a dart is a fine, precise seam. To avoid unsightly excess thickness:
- Finish the seam by stitching parallel to the fold, just 1 mm from it.
- Do not make a backstitch at the end of the dart to avoid a seam that is too thick.
- Cut the threads, leaving about 10 cm of length so that they can be tied neatly.
Hand knot the threads for a clean finish

Once the sewing is finished:
- Knot the threads by hand rather than backstitching.
- Using a needle, slide the threads into the clip so that they are invisible on the right side.
- Trim the threads flush with the fabric to prevent them from sticking out.
Why is this step important? It ensures a clean finish and a clamp end without visible excess thickness .
Iron the clamp properly for a dropped fluid

Ironing is a crucial step to secure the clip and prevent it from being too noticeable.
- Open the fabric and iron on the reverse side.
- Use a tailor's cushion or the edge of your ironing board to shape the dart and prevent it from marking excessively.
- Place the tip of the pliers in the gap so as not to crush the fabric there.
- Smoothly iron from the base to the tip B , without pressing too hard.
Tip: For impeccable ironing, use a warm iron and steam to soften the fabric fibers.
Tip for fabrics that mark too much
Some fabrics retain pinch marks after ironing. Here's how to avoid them:
Check the rendering on the right side of the fabric

After ironing, check that the clip is properly integrated and does not form any visible excess thickness .
- The clip must be discreet and fluid , without creating a pocket effect.
- If the fabric remains slightly marked, iron with an intermediate fabric to soften the pressure of the iron.
Remember: The thicker the fabric, the more essential this step is to avoid overly visible relief.
Use a strip of cardboard to avoid marks
If the fabric marks too much after ironing:
- Slide a strip of cardstock between the fabric and the clip before ironing.
- This prevents the heat of the iron from crushing the clamp too much and leaving a visible mark on the area .
Why does this technique work?
The paper absorbs pressure and protects the fabric fibers from excessive crushing.
How to open a clamp in thick fabric?
Thick fabrics, such as wool or denim, can cause excess bulk if the dart is simply folded to one side. Here's an effective way to fix this.
Crush the clamp to avoid marks
- Rather than laying the clip on one side, flatten it in the middle with the iron.
- This helps flatten the thickness and distribute the fabric evenly.
Why is this method useful?
It allows you to obtain a flat and fluid clip , ideal for coats and very thick fabrics.
How to sew a double dart in sewing?
What is a double clamp?
A double dart consists of two opposing triangles, forming a diamond at its base. It follows the same principle as a single dart, but with two symmetrical seams, creating a more pronounced shape and a better distributed volume.
Where can you find double clamps?
- On the front or back of a blended dress.
- At the waist of fitted blouses and jackets.
- On certain pants and skirts for a structured effect.
Here are the different steps to follow for an impeccable finish
Mark the landmarks

As with a simple dart, you must first transfer the pattern markings to the reverse side of the fabric:
- Point B to identify the high tip of the clamp.
- Points A and A' located in the middle represent the depth.
- Point C marks the lower end of the clamp.
Tip: For greater precision, use an erasable fabric pen or a pattern wheel .
Trace and pin the clip

Once the marks have been drawn, pinch the fabric right sides together , making sure that points A and A' are perfectly aligned .
- Use a pin to stabilize the layers of fabric.
- Draw a line dependent on the points , as for a simple clamp.
Why is this step essential? Poor alignment can distort the garment during assembly.
Mark the fold between B and C


To ensure better support before sewing:
- Lightly iron the fold between B and C to mark the seam line.
- For thin and slippery fabrics, it is advisable to trace the dart on the fabric flat before darting.
Make the first seam

The double dart is sewn in two stages :
- Start by sewing from A/A' to B or C.
- Backstitch at the start to secure the seam.
- Finish without a backstitch at the tip to avoid excess thickness.
Make the second seam

Once the first seam is finished:
- Sew the second part of the dart , identical to the first.
- Respect the alignment for perfect symmetry .
As with the previous clip, make a double knot by hand to obtain a nice flat clip at the top of it.

Conclusion :
Darts are a key element in sewing , allowing you to adjust a garment to the shape of the body and ensure a smooth, structured drape. Whether you're making a single or double dart, or working with thin or thick fabric, precision and finishing are essential to ensure a clean, professional finish.
Things to remember for successful pliers:
- Mark the reference points precisely and check the alignment before sewing.
- Pin carefully to avoid any shifting.
- Sew with the correct tension and without backstitching at the end.
- Slide the wires into the pliers for a clean, invisible finish.
- Iron carefully to avoid marks and secure the clip smoothly.
- For thick fabrics , open or release the clamp to avoid excess thickness.
By following these tips, your darts will be clean, well-adjusted and perfectly integrated into the garment !
And you, what are your tips for impeccable tweezers? Share your experiences in the comments!

Leave a comment
All comments are moderated before being published.
This site is protected by hCaptcha and the hCaptcha Privacy Policy and Terms of Service apply.