


Table of contents:
Starting sewing can seem intimidating when faced with a sewing machine, fabric choices, and unfamiliar tools. However, with the right basics, every gesture becomes a source of pride.
This article guides you to choose an accessible machine, master the essentials, avoid slippery or stretchy fabrics, and discover the ideal cotton poplin for beginners. Concrete projects and tips to solve your machine’s quirks will help you progress calmly, cultivating patience and creativity. Turn your ideas into reality, one stitch at a time.
The essential equipment to start sewing (without breaking the bank)
Learning to sew doesn’t require investing in a costly arsenal of tools. In a few simple steps, you can start with a budget suited to your needs. To begin sewing under good conditions, just focus on a few well-chosen essentials. Here is a basic selection to avoid purchase mistakes and start confidently.
The sewing machine: your best ally to start
Contrary to popular belief, an electronic machine is ideal for beginners. It offers features like speed adjustment, presser foot position indicators, and a one-step automatic buttonhole.
These tools simplify learning and reduce mistakes. Mechanical models, although sometimes cheaper, lack these aids and can discourage novices.
For a first purchase, budget between €150 and €200 for a reliable electronic machine. Second-hand models like the Lewenstein Lilly (€180-200) or the Janome 9077 (€560-600) offer a good balance between quality and simplicity. Favor brands like Juki, Janome, or Lewenstein, known for their durability and after-sales service.
The essential sewing box: the tools you won’t be able to do without
To sew efficiently, a few basic tools are enough. Here is an essential list to avoid frustrations:
- A good pair of sewing scissors: Reserved only for fabric, to prevent them from dulling. Prefer ergonomic models suited to the dominant hand.
- A thread cutter or small scissors: To cut threads precisely, especially after sewing or to trim corners.
- A seam ripper: A true right to make mistakes for beginners, this tool allows you to undo failed seams without damaging the fabric.
- Fine pins: To hold fabrics before sewing. Opt for flat-head models for better hold.
- A measuring tape: Essential for measuring fabrics and taking precise measurements. Choose a flexible one with sufficient length (1.50 m).
- A tailor’s chalk or erasable pen: To mark guides on the fabric. The erasable pen, whose ink disappears with the iron, is ideal.
- Spare machine needles: To be changed regularly depending on the fabric used. Sizes 70/10 or 80/12 suit most simple projects.
- An iron: For neat finishes. A steam model makes smoothing seams and folds easier.
Investing in these durable tools guarantees smooth learning. To start sewing, there is no need to multiply accessories: a few well-chosen essentials are enough to progress quickly. For example, quality scissors (around €30) prevent uneven cuts, while a well-chosen measuring tape simplifies measurements.
For tight budgets, buy in-store to benefit from advice or opt for refurbished second-hand, but always check the local repairability of the machine.
Easily find all the accessories you will need for sewing at Verotex.

Choosing your first fabrics: the secret to not getting discouraged
Choosing the right fabric determines the success of your first sewing projects. Selecting a suitable fabric avoids frustrating mistakes and turns learning into a positive experience. To start sewing, it is recommended to favor materials that are easy to work with, such as cotton or poplin, to avoid disappointment linked to a fabric that is too complex. Did you know that 70% of beginners give up after a first failure related to choosing an unsuitable fabric? Here’s how to avoid this trap by adopting a fabric suited to your level.
The "friendly" fabrics for beginners: where to start?
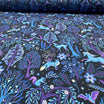
Favor stable and easy-to-handle fabrics. Cotton poplin is ideal. Thin, supple, and tightly woven, it withstands frequent mistakes. Poplin is suitable for dresses, shirts, and covers. Cretonne, thicker, offers solid support for accessories like cushions. Chambray (similar to denim) is perfect for pants or shirts. Finally, washed linen provides a natural structure and is ideal for wipes or towels.
To start sewing, choosing this type of stable fabric allows you to progress calmly without being discouraged by materials that are too slippery or stretchy. Using a Juki sewing machine also makes learning easier, thanks to their precision and robustness, ideal for simple projects.
For simple projects, opt for cotton canvas tote bags or elastic-waist chambray skirts. These models combine ease of assembly and the use of stable fabrics. Beginners gain confidence by avoiding demanding fabrics.
Fabrics to avoid (for now)
When you start sewing, avoid the following fabrics:
- Stretch fabrics like jersey that stretch and distort seams.
- Viscose or silk, fluid fabrics that slip under the needle, making cutting imprecise.
- Velvet, which demands constant attention for a uniform finish.
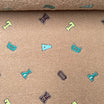
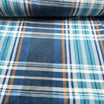
- Fabrics with complex patterns (checks, stripes) that require precise matching, reserved for experienced sewers.
- Very fine fabrics (cotton voile, satin) that require extreme precision, often inaccessible at the beginning of learning.
- Materials with identical right and wrong sides increase the risk of errors.
Don’t be tempted by these materials before mastering the basics: failure could discourage you. Focus on generous fabrics with which every seam teaches a lesson without frustration. These choices are essential to start sewing with pleasure and progress step by step.
Whether for making textile accessories or sewing a garment, you will find all types of fabrics at Verotex.
The crucial step before cutting: why wash and iron your fabric?
Unwashed fabric can shrink after the first use and make your creation too small. Shrinkage mainly affects natural fibers like cotton or linen. By pre-washing, you also remove industrial finishes and set the dimensions.
To start sewing, getting into the habit of washing and ironing your fabric before cutting helps avoid many disappointments, especially on your first projects. If you use a mini sewing machine, these preparations become even more important, as precise cutting and well-smoothed fabric greatly facilitate the work.
Always iron the fabric to remove wrinkles, because a smooth surface ensures precise cutting to avoid misaligned seams. This often overlooked step is the key to a durable project.
For fitted clothing projects, pre-washing is essential. However, for accessories like wipes or blankets, a slight size variation is acceptable. By following these steps, you maximize your chances of success from the very first project.

Your first steps: from pattern to first stitch
Learning to sew can seem intimidating, but by following simple steps, you will quickly transform a piece of fabric into a useful creation. Did you know that 80% of beginners give up due to lack of understanding of the basics?
Don’t be part of this group: master the pattern, choose accessible projects, and prepare your fabric carefully. These key steps will guide you to success, even if you start with no experience.
Understanding the language of a sewing pattern
A pattern is a technical plan where each symbol has a precise function. The grainline indicates the fabric direction to align with the selvages. If you neglect this step, the garment may deform. To start sewing, it is essential to understand the pattern symbols and markers well, as they guide each assembly step and prevent common mistakes.
Seam allowances (usually 1.5 cm) mark where to stitch, while notches (lines or diamonds) ensure piece alignment. For beginners, the grainline is easy to spot: without selvage, rub a pin on the fabric. The threads that slightly separate indicate the direction to follow.
Keep the original pattern by adding it onto tracing paper: this will allow you to reuse it for other sizes. Symbols like circles for eyelets or parallel lines to adjust length will quickly become your allies.
A legend always accompanies the patterns, even if the codes vary by brand. For those who really want to start sewing with confidence, taking the time to study these markers from the first project makes all the difference.
Ideas for simple and rewarding first projects
Each creation builds confidence and basic techniques while remaining fun. You will find many free patterns and video tutorials to guide you. To start sewing, it is wise to begin with simple projects that allow practicing straight stitches and assembly without getting discouraged.
The following projects develop essential skills without overwhelming beginners:
- Makeup remover wipes or washable paper towels: Ideal for practicing sewing straight lines on small surfaces. Use thick cotton and a straight stitch to avoid puckering. Video tutorials explain how to align fabrics and reinforce corners.
- The wallet-shaped cushion cover: Learn how to measure precisely and assemble rectangles. This practical project teaches the invisible zipper and seam allowance calculation. A tip: use patterned fabric to hide small sewing flaws.
- The Tote bag: a classic to master straight seams, handle attachment, and topstitching. An online tutorial shows step by step how to create integrated pockets. For a sturdy bag, choose cotton canvas or recycled fabric. Discover a free guide to complete this project in 45 minutes.
- The elastic waist mini skirt: First approach to a garment. The elastic simplifies fitting and avoids complex closures. You will find free patterns to start sewing, like the Mina skirt, which includes step-by-step instructions.
Preparation, 80% of the work: cutting and preparing your fabric
Before sewing, the fabric must be perfectly prepared. Wash it to avoid shrinkage, then iron it for a precise cut. When starting to sew, getting into the habit of carefully preparing the fabric and pattern is essential: it makes cutting easier and reduces errors.
Place the pattern respecting the grainline: if the fabric has a selvage, the pattern arrow must be parallel to it. Pin the pieces firmly to avoid shifting. For thick fabrics, a rotary cutter and a 60 cm ruler ensure clean cuts.
The edges of fraying fabrics must be protected. Use a serger or the zigzag stitch on your machine, like Juki machines, to reinforce the edges. This simple step prevents unsightly gathers and extends the life of your work.
To start sewing, it is also recommended to label each cut piece: this avoids confusion during assembly and makes the project smoother. For slippery fabrics like silk, fine pins hold the pieces in place without damaging them.

"Help, my machine is glitching! : the beginner's troubleshooting guide
Are you just starting to sew and your machine refuses to work? Rest assured, 90% of problems stem from simple errors that are easy to fix. These challenges are part of the learning process. Here are practical solutions to get back on track calmly with tips to properly prepare your sewing machine.
Why isn't my sewing perfect? Identify and solve common problems
Technical difficulties are frequent, even for experienced seamstresses. Here are the five most common problems, with their causes and solutions, to progress without frustration:
|
Common problem |
Possible causes |
Simple solutions to try |
|
The top thread breaks |
1. Machine threaded incorrectly. 2. Thread tension too tight. 3. Needle damaged or unsuitable. |
1. Rethread the machine (presser foot raised). 2. Lower the tension. 3. Change the needle. |
|
The bobbin thread forms loops |
1. Bobbin inserted incorrectly. 2. Upper thread tension too low. |
1. Reinsert the bobbin correctly. 2. Increase the upper tension. |
|
The machine "skips" stitches |
1. Unsuitable or damaged needle. |
1. Replace with a suitable needle (stretch, denim, etc.). |
|
The fabric puckers or wrinkles |
1. Excessive tension. 2. Needle too large. |
1. Reduce the tension. 2. Use a finer needle. |
|
The needle breaks |
1. Pull the fabric instead of guiding it. 2. Unsuitable needle. |
1. Let the machine feed the fabric. 2. Choose a sturdy needle (size 90-100 for thick fabrics). |
Mistakes like incorrect threading or an unsuitable needle are normal. To start sewing, it is important to understand that these small incidents are part of learning and are often easily resolved, for example by changing the needle.
Did you know that 80% of beginners solve their problems by changing the needle? Free video tutorials guide you step by step. For example, a stretch needle for jerseys or a microtex needle for technical fabrics.
To avoid blockages, regularly clean your machine with a fine brush, keep needles suitable for different fabrics, and download simple patterns like cushions or cotton bags.
With these tips, turn your "bugs" into progress! For those who really want to start sewing calmly, following these tips from the start helps build confidence and avoid frustration.
Is your machine not working anymore? The Verotex professional will know how to get it running again. Call us for effective repair.
Progressing in sewing: cultivating patience and finding the right resources
Starting sewing is an exciting adventure, but progressing requires more than just a desire to create: patience and consistency are true allies. Every imperfect stitch becomes a learning opportunity, every completed project boosts confidence. To move forward calmly, it is essential to surround yourself with the right resources, whether tutorials, specialized books, or inspiring communities, to turn perseverance into real know-how.
The secret ingredient: patience and consistency
Sewing is not a skill acquired in a day. Every stitch sewn is a step toward expertise, but you must accept mistakes as learning opportunities. To start sewing, it is essential to consider each small project as an exercise, rather than aiming for perfection from the start.
Imagine a marathon: the first steps are slow, but consistency pays off. A 20-minute session per week is better than sporadic hours. The seam ripper becomes your best ally to correct mistakes without frustration. Imperfection is part of the process, even for experienced sewers.
A poorly done project is not a failure, but a concrete lesson. Every imperfect seam strengthens your technical mastery. Without patience, even the basics seem insurmountable. It is this quality that turns a novice into a confident creator.
To progress calmly and start sewing, set realistic goals like one seam a day and one project a month. Progress will be visible over time.
Where to find help and inspiration to keep going?
To avoid isolation, several resources guide beginners. Here are accessible solutions:
- Video tutorials: Channels break down the steps visually. Ideal for seeing complex gestures.
- Online communities: Join Facebook groups dedicated to sewing to exchange with other enthusiasts. Sharing experiences accelerates learning.
- Beginner books: they provide solid foundations with diagrams and concrete projects.
- Structured courses: Local workshops or online training, like those from Verotex, offer personalized support to overcome obstacles.
These tools multiply the chances of success by combining theory, practice, and support. To start sewing, it is recommended to take advantage of these resources from the first project to progress calmly and avoid frustration. The key? Never underestimate the value of free resources to progress at your own pace. And remember: every seamstress started with a first stitch.
Starting sewing requires patience and the right tools: a mechanical machine, stable fabrics, a seam ripper. Each project is a learning step: mistakes are part of the process. Thanks to tutorials and communities, you will progress calmly. Regular practice refines your technique and creativity.

Leave a comment
All comments are moderated before being published.
This site is protected by hCaptcha and the hCaptcha Privacy Policy and Terms of Service apply.