


Table of Contents:
The invisible zipper is an essential finish to achieve a garment with clean and discreet seams . It is ideal for dresses, skirts, and pants because it integrates perfectly into the seam without being visible.
In this article, we will explore how to install an invisible zipper with facing or with a waistband.
How to install an invisible zipper with facing?
The facing is a piece of fabric used to to reinforce and structure the inside of a garment , especially around the neckline or waist. Installing an invisible zipper on a garment with facing requires precision to ensure a harmonious finish.
Prepare the garment before installing the zipper pull?


Before installing the zipper pull, you need to prepare the garment:
- Assemble right sides together the bottom of the facing with the top of the garment side.
- Leave about 5 cm before finishing the seam to insert the zipper pull.
- Draw the seam allowance marks to properly position the zipper.
- Make sure the top marks matching the pattern allowances, and place the bottom marks 3 cm above the end of the zipper pull .
Attach the first side of the zipper pull
 .
. 
Once the marks are made:
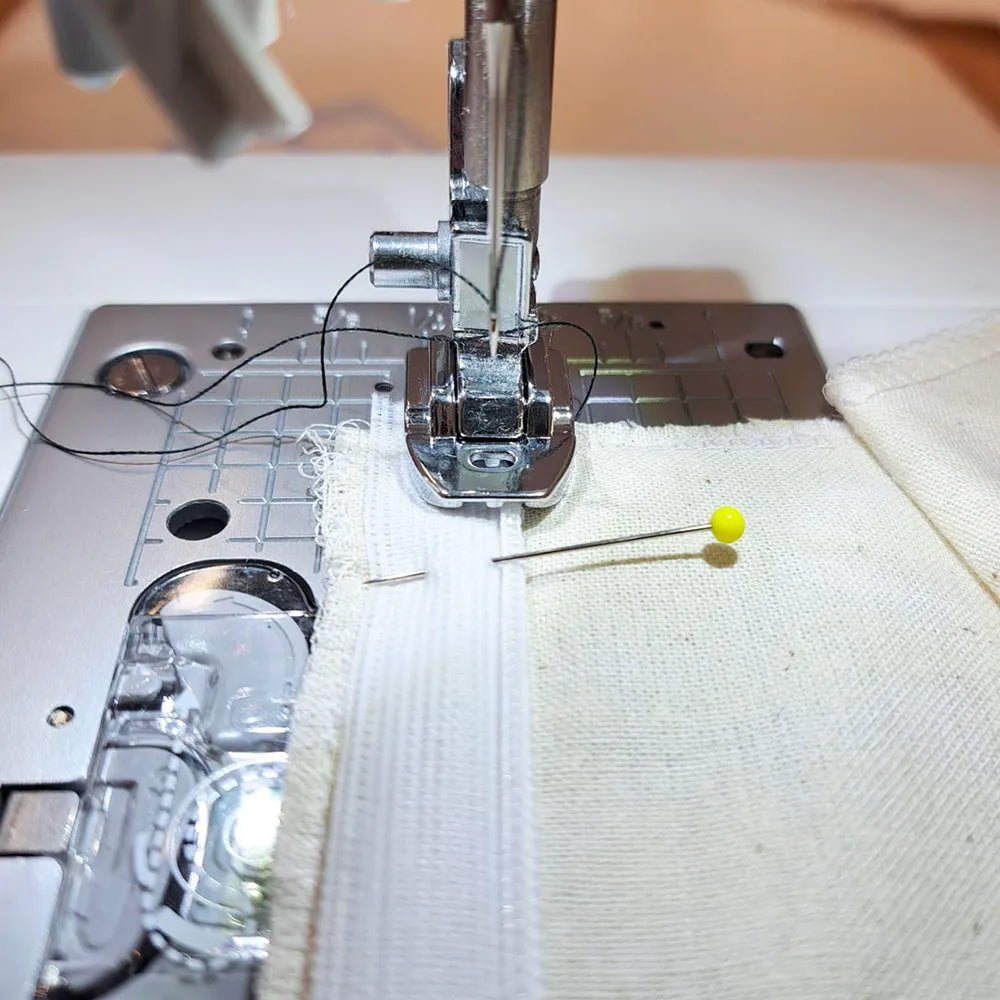
- Sew right sides together one side of the zipper pull with the edge of the fabric.
- Position the zipper teeth in the groove of the presser footholding them open firmly with your fingers.
- Sew as close as possible to the teeth so that the zipper remains invisible once closed.
- Make sure the zipper pull is sewn 1 cm below the end of the first seam .
Ensure perfect alignment


To avoid misalignment between the two sides of the zipper pull:
- Close the zipper and align it with the folded seam.
- Mark a guide at the same height on the zipper pull and on the fabric to ensure a perfect alignment on both sides.
- Sew the second side of the zipper pull right sides together with the garment.
finish sewing the zipper pull with the facing


Once the zipper pull is installed:
- Trim again 5 mm from the edge of the facing to help form the fold.
- Sew right sides together the facing, the zipper pull, and the seam allowance.
- Sew 5 mm from the teeth to prevent the facing from blocking the zipper.
- Fold the seam allowance (including the zipper pull) toward the inside and finish the unfinished seam.
- Cut away the excess fabric at the corners and turn everything right side out.
How to install an invisible zipper with a waistband?
When the invisible zipper is combined with a waistband, the method is slightly different. You need to make sure the zipper pull stays properly aligned with the waistband for a flawless finish.
Prepare the seam for a zipper pull with waistband

Before installing the zipper pull:
- Mark the sewing guides as with the facing.
- Assemble right sides together both sides of the garment, removing the zipper pull allowance.
- Assemble right sides together the bottom of the right side of the waistband with the top of the garment sides .
- Assemble right sides together the top of the right side of the waistband with the top of the wrong side of the waistband leaving 5 cm before the end of the seam .
Sew the zipper pull onto the garment with the waistband


- Assemble one side of the zipper pull right sides together with the garment.
- Position the plastic stopper just below the seam allowance .
- Close the zipper and position it on the folded seam.
- Mark two guides on the zipper pull and fabric : one at the bottom of the waistband and another at a chosen point for alignment.
Finish sewing the zipper pull with the waistband

- Take 5 mm from the edge of the inner waistband to avoid bulkiness.
- Assemble right sides together the inner waistband and the zipper pull .
- Sew 5 mm from the teeth for a clean finish.
- Fold the seam allowance (including the zipper pull) toward the inside , then finish the unfinished seam.
- Cut the excess fabric in the corner and turn everything inside out for a clean finish.
What are the tips for a successful invisible zipper?
To achieve a flawless finish, here are some essential tips:
- Sew as close to the teeth as possible: place the zipper teeth in the notch of the presser foot and use your fingers to flatten it well.
- Baste before machine sewing : this helps hold the zipper pull in place and prevents slipping during sewing.
- Check the seam alignment : the sides of the zipper pull must join the garment seams for a harmonious finish.
Conclusion:
Installing an invisible zipper requires precision and patience , but the result is worth it.
Remember:
- Carefully prepare the garment by marking precise guides.
- Use the right presser foot to sew as close to the teeth as possible.
- Align both sides of the zipper pull perfectly for a symmetrical finish.
- Trim the seam allowances in the corners to avoid bulkiness.
- Finish the sewing neatly with the facing or waistband for a professional result.
With these techniques, your invisible zippers will be perfectly integrated and undetectable once the garment is finished.


Leave a comment
This site is protected by hCaptcha and the hCaptcha Privacy Policy and Terms of Service apply.