


Table of Contents:
It is one of the first major steps to progress in sewing, but also one of the most intimidating for beginners. Between mysterious symbols, overlapping size lines, sometimes missing seam allowances, and pieces to transfer, it can seem difficult to understand how to use a pattern correctly. Yet, once decoded, a pattern becomes a true guide: it shows where to cut, how to assemble, and how to achieve a well-fitted garment.
In this introduction, you will discover why knowing how to read a pattern is essential to gain independence, avoid cutting errors, and succeed in your projects on the first try. This comprehensive guide will accompany you step by step: understanding symbols, choosing the size, transferring the pattern, cutting, assembling… as well as many tips to confidently decipher a pattern.
Thanks to this clear and detailed user guide, you will learn to use any sewing pattern, whether it comes from an independent brand, a magazine, or a PDF download. Your progress starts here.
Why is learning to read a sewing pattern essential?
Learning to read a sewing pattern is a crucial step for anyone who wants to improve their sewing skills. A pattern is not just a set of lines: it is a true roadmap that shows how to position the fabric, which pieces to cut, how to assemble them, and how to achieve a well-fitted garment. Without understanding this information, even a simple project can become complicated, inaccurate, or poorly fitted.
To avoid common mistakes — like cutting the wrong size, misaligning the fabric grain, or assembling pieces incorrectly — it is essential to know how to decipher the symbols, markings, and overall structure of a pattern sheet. This understanding transforms your sewing projects: from simple trials, they become controlled, clean, and professional creations.
Reading a pattern: what a sewing sheet really contains
Before even cutting your fabric, it is essential to understand what you are looking at.

A pattern sheet gathers several key pieces of information:
-
Cutting lines: often multiple, they correspond to different sizes.
-
Notches: these small marks help align pieces correctly during assembly.
-
Grainline: an arrow indicating the direction to place the pattern on the fabric.
-
Specific symbols: folds, button marks, assembly lines, possible seam allowances.
-
Required pieces: some must be cut multiple times or on the fabric fold.
Understanding these elements helps avoid most beginner mistakes and approach your project preparation with much more confidence.
How to understand the symbols on a sewing pattern?
When starting out, a sewing pattern can look like a mysterious map filled with lines, arrows, dotted lines, and all kinds of marks. Yet, each symbol has an essential role: it guides you to correctly place the pattern on the fabric, cut the right pieces, respect assembly directions, and sew with precision. Learning to recognize them saves time, avoids cutting mistakes, and results in a clean, professional finish. Let’s explore the essential symbols you need to know.
Universal symbols: lines, notches, grainlines, folds, and marks
Each pattern uses an internationally recognized graphic language. Here are the most common:
-
Grainline: a long arrow that must be aligned parallel to the fabric’s selvage.
-
Notches: small triangles or lines used as assembly points.

-
Folds and darts: indicated by double lines or triangular shapes to fold.
-
Cutting lines: often several, corresponding to different sizes.

-
Button marks, pocket placement, hems: marked by specific symbols depending on the brands.
Understanding these symbols means knowing how to “read” your garment even before sewing it.
How to read multiple sizes on the same pattern
Most modern patterns are multi-size, meaning all sizes are printed together. To avoid mistakes:
-
Identify the line that matches your size (often marked with a color code or a different line style).
-
Follow it closely without taking your eyes off the curve to avoid switching to another size.
-
Check the gradations: some areas (shoulders, hips, armholes) require extra attention.
Understanding these lines allows you to cut the pattern precisely and get a well-fitting garment from the first try.
How to use a sewing pattern step by step?
Once you understand the symbols and markings on a pattern, it’s time to move on to practical use. Following a sewing pattern requires method: identify the pieces, transfer them onto the fabric, cut neatly, then assemble in the correct order. By following the steps below, even a beginner can use a pattern accurately and achieve a clean, consistent result. Let’s go through the process together to approach your project with confidence.
Identify the pieces and prepare the pattern
Before cutting, start by examining the sheet or the PDF file:
-
Locate all the pieces needed for the design.
-
Check how many times each piece needs to be cut (e.g., x2, on the fold, in lining).
-
Read the general pattern instructions to understand the assembly order.
-
Cut or trace the pieces in the correct size by following the line that matches your measurements.
This preparation is a key step: it helps you avoid choosing the wrong size or forgetting an essential piece.
Transferring the pattern: tracing paper, carbon paper, tracing wheel, and beginner methods
Transferring the pattern is an essential step to prepare your sewing pieces correctly. Among all the available techniques, using tracing paper is often the simplest and safest for both beginners and experienced sewists. Here are the methods in the recommended order:
1. Tracing paper or tissue paper (recommended method)
Ideal for preserving an original pattern, especially when it is multi-size.
-
You spread the pattern out on the table.
-
You place the tracing paper on top.
-
You neatly trace all lines, symbols, and notches.
-
You cut the traced version, which is easier to handle.
This method extends the life of the pattern, allows you to keep multiple sizes, and offers better accuracy.
2. The carbon paper + tracing wheel method
Very useful for transferring internal markings (darts, pleats, hem lines).
-
Place the carbon paper between fabric and pattern.
-
Use the tracing wheel to transfer the lines.
-
Perfect for fabrics that don’t slip.
3. The classic method: pin + cut
You place the pattern directly on the fabric, pin it, then cut around it.
Fast, but less precise and less suitable for multi-size patterns.
4. Sewing weight + rotary cutter
Perfect for fine, slippery, or stretchy fabrics.
Allows for a very clean cut without distorting the fabric.
Whatever method you choose:
-
Always place each piece respecting the grainline.
-
Reproduce all notches, pleats, and markings.
-
Double-check before cutting.
Cut the fabric cleanly without deforming the edges.
A good cut determines the quality of your sewing. To avoid distortions:
-
Use a pair of sharp scissors or a rotary cutter.
-
Never lift the fabric while cutting.
-
Follow the cutting line slowly to stay on the correct size.
-
Cut the notches precisely (or mark them with chalk if you prefer).
You will get clean, even pieces ready to assemble without additional adjustments.
How to choose the right size on a pattern?
Choosing the right size is one of the most important steps when using a sewing pattern. Unlike ready-to-wear clothing sizes, pattern sizes are based on precise measurements rather than brand standards. Even if you think you "wear a 38" or "an M," it is essential to check your measurements to avoid a garment that is too tight, too loose, or poorly proportioned. Fortunately, this step is simple once you know what to measure and how to interpret the provided size chart.
How to take your measurements correctly?
To choose the right size, start by taking three essential measurements:
-
Bust circumference: measure around the fullest part.
-
Waist circumference: measure at the narrowest part.
-
Hip circumference: measure around the widest part of the hips.
Use a flexible tape measure, keep it horizontal, and don’t pull too tight. Write down your measurements in a notebook to refer to for your future projects.
Read the pattern’s size chart
Each pattern includes a size chart showing the exact measurements for each size. To choose well:
-
Compare your measurements to the indicated values.
-
Choose the size that corresponds to your largest measurement.
-
Prefer adjusting an area that’s too wide rather than ending up with a garment that’s too small.
This method ensures a garment better suited to your body shape.
Adjusting a pattern if your measurements fall between two sizes
It’s common to fall between two sizes. In this case:
-
Follow the size that matches your largest measurement.
-
Adjust other areas by “mixing” the lines of different sizes.
-
Smooth the transition between two sizes for a harmonious result.
Example:
You are size 38 at the bust but 40 at the hips → choose size 40 and slightly adjust the top.
Simple adjustments for a perfectly fitted pattern
Once the size is chosen, a few quick adjustments can help:
-
Lengthen / shorten a torso or a leg
-
Widen or narrow a dart
-
Slightly modify the curves (hips, neckline, etc.)
By taking the time to choose the right size and adjust if needed, you ensure your garment has a perfect fit and optimal comfort.
Bonus tips for how to learn to read and use a sewing pattern?
Once you master reading the symbols, choosing the size, and using a pattern step by step, you can go even further to gain precision, efficiency, and confidence. These bonus tips aren’t essential, but they truly transform your sewing experience by allowing you to work more neatly and calmly.
Choose beginner patterns to progress without stress
If you’re a beginner, choose patterns specially designed for novices:
-
simple shapes,
-
few pieces to cut,
-
easy-to-understand symbols,
-
clear and illustrated instructions.
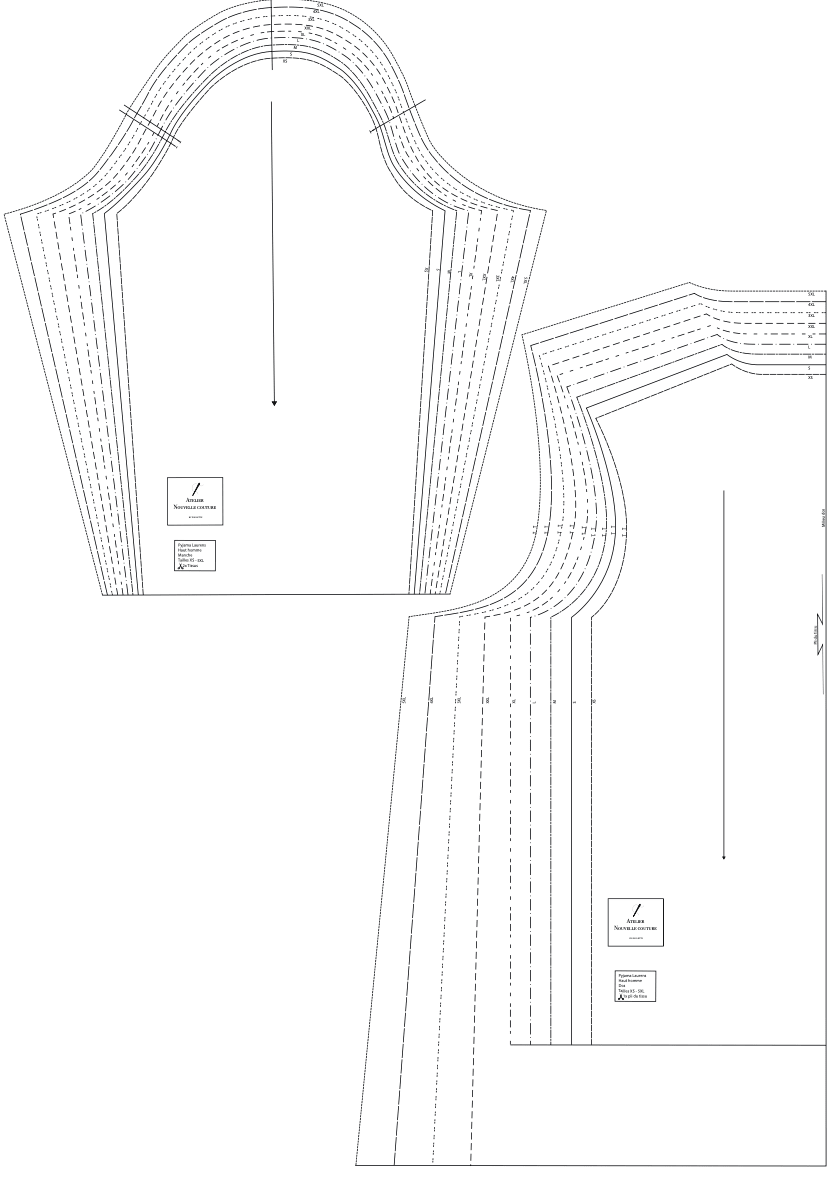
These models help you get familiar with the logic of a pattern before moving on to more complex projects. Among the ideal brands to start with is Atelier Nouvelle Couture, which offers inclusive patterns, well explained and perfectly suited for beginners.
Using tracing paper to create multiple versions of the same pattern
Tracing paper is an excellent ally for:
-
preserve the original pattern,
-
trace multiple sizes,
-
test several adjustments,
-
customize your model without damaging the sheet.
This method is especially useful for multi-size patterns or garments you want to make multiple times.
Keeping a sewing journal to track your adjustments
A notebook dedicated to your sewing projects helps improve your results over time. You can note:
-
your updated measurements,
-
sizes chosen according to brands,
-
adjustments made,
-
difficulties encountered,
-
modifications to plan for the next version.
With this notebook, you save valuable time and avoid repeating the same mistakes.
Test the pattern on a toile before the final fabric
Making a toile (often with calico) means testing the model on a basic, inexpensive fabric. This allows you to:
-
check the size,
-
adjust lengths,
-
alter curves,
-
anticipate assembly difficulties.
It’s an excellent way to get a perfectly fitted garment right from the final version.

Leave a comment
This site is protected by hCaptcha and the hCaptcha Privacy Policy and Terms of Service apply.