


Table of Contents:
Dive into the world of sewing with the JUKI HZL-53E sewing machine by learning how to optimally prepare the bobbin. Our detailed guide walks you through each step, offering practical tips to get the most out of your sewing machine. Whether you are a beginner or experienced, enhance your sewing skills with these essential tips.
JUKI HZL-53E Sewing Machine:
As a beginner, the JUKI HZL-53E sewing machine is the best choice since it is easy to use and offers a variety of stitches. Of course, if you are looking for an even more advanced and versatile experience, you might also consider investing in a Juki HZL DX7 sewing machine, known for its precision and features suited for more complex sewing projects.
One of the first things to learn is how to use a bobbin. A sewing machine bobbin is a small essential spool that feeds the thread from underneath. It is placed under the needle plate, and without it, our stitching wouldn’t be as strong.
One of the first things to learn is how to use a bobbin. A sewing machine bobbin is a small essential spool that feeds the thread from underneath. It is placed under the needle plate, and without it, our stitching wouldn’t be as strong.

In this blog, we will explain how to make a bobbin with the JUKI HZL-53E sewing machine.
Making a bobbin with the JUKI HZL-53E
It’s not always obvious how to make a bobbin, but don’t worry, it’s not complicated! Follow the steps in this tutorial and you’ll master sewing on your JUKI HZL-53E.
We also offer an explanatory video for better tutorial follow-up.
Step 1: First, make sure your sewing machine is plugged in, then place the original spool containing the thread you want to use on the spool pin.

Step 2: Now take the thread and pass it through the path (steps 2 and 3), then through the small hole of your bobbin (not the bobbin opening) as shown in the images below.
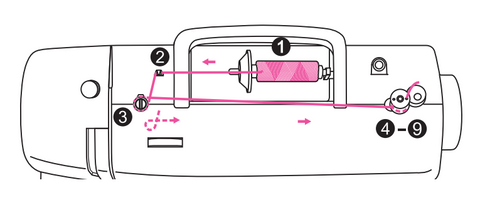

Step 3: Then place the bobbin on its holder while holding the thread. Make sure you have tilted the bobbin to the right.
Step 4: From there, press (hold down) your foot pedal while still holding the bobbin thread, and voilà, your thread will wind itself around your bobbin!
Once you have filled half of your bobbin, cut the thread you were holding, then continue holding the pedal. If you use a Juki flatbed sewing machine, you will appreciate the regularity of the winding and the smoothness of the work. When finished, cut the thread connecting to the spool.
Inserting the bobbin into the JUKI HZL-53E
Now that you know how to make a bobbin, all that’s left is to insert it into your sewing machine. It’s just as easy as making a bobbin.
The previously mentioned video will also show you how to insert it.
Step 1: First, remove the bobbin case cover. Place your bobbin with the free thread end passing under the notch as shown on your machine, then replace the cover.


Step 2: Now take the thread from your original spool and pass it through the thread guide on your machine. If you work with a Juki coverstitch machine, you will appreciate the precision of its automatic needle threader, which helps you easily thread the needle eye even on the most technical projects.


Step 3: Then lift your presser foot to pass your thread to the back. Use the handwheel on the right of your machine to catch the bobbin thread with your needle. For a perfectly neat finish after sewing, don’t hesitate to complement your setup with Juki ironing equipment, known for their efficiency and compatibility with professional use.
There you go, you’re all set to start sewing!
HZL-53E Features:
- Sewing speed: max. 750 sti/min
- Stitch length: max. 4 mm
- Stitch width: max. 7 mm
- Presser foot height: 2 steps max. 9 mm
- Needle: HAx1
- Dimensions: 410 (L) * 177 (W) * 308 (H) mm
- Weight: 7.1 kg
We offer several simple tutorials on our blog if you are new to sewing. Also find us on Facebook, Instagram, and TikTok!


Leave a comment
This site is protected by hCaptcha and the hCaptcha Privacy Policy and Terms of Service apply.